Most businesses set up Google Search Console wrong—Here’s How to do it right
What if I told you that it takes less time to set up Google Search Console on your website than it takes to make a cup of coffee?
Well, in this post, we’re going to show you just how easy that is.
How to Set Up Google Search Console for Your Business Without the Headache
Alright, in the previous post we covered what Google Search Console is and how it benefits you and your website – but setting it up? Well, it sounds intimidating, but in fact it’s easier than you think. And the best part about Search Console is that it’s totally free!
I recommend doing this as soon as possible as it takes a few days to verify and will start collecting valuable data, it helps to have as much historical data as possible.
So, in under 10 minutes, we’ll have you set up on your website and ready to go without the stress.
Signing into Search Console
Right, how to access Google Search Console:
- First up, go to search.google.com/search-console
- Click on ‘Start now’. Then you’ll see a prompt to ‘Add a property’. Which sounds fancy, but it just means “Tell Google the web address of your website”. All you’re doing here is proving to Google that you own this website. You’re verifying it by doing something that only the owner can do which prevents others from claiming your website and potentially doing damage.
- If you’re not already logged in with your Google account then you’ll need to sign it. Chances are you’ve already got a Google Account, it’ll be the same one you might use for Gmail, YouTube, Google Analytics… basically anything Google – if not just create a free account.
Choosing Verification Type
Now, how to verify domain in Google Search Console…
You’ll be prompted with this dialog box asking to choose between a ‘Domain property’ or a ‘URL-prefix’ property.
Let me give you that in plain English:
- ‘Domain’ will add all versions of your site; those beginning with http, https, www, non-www-all of it, subdomains – everything.
- ‘URL-prefix’ only covers the exact address you give it. Imagine you have a domain of mybusiness.com and have different subdomains for your blog and shop. You might only want to report on blog.mybusiness.com and not mix it in with data from shop.mybusiness.com
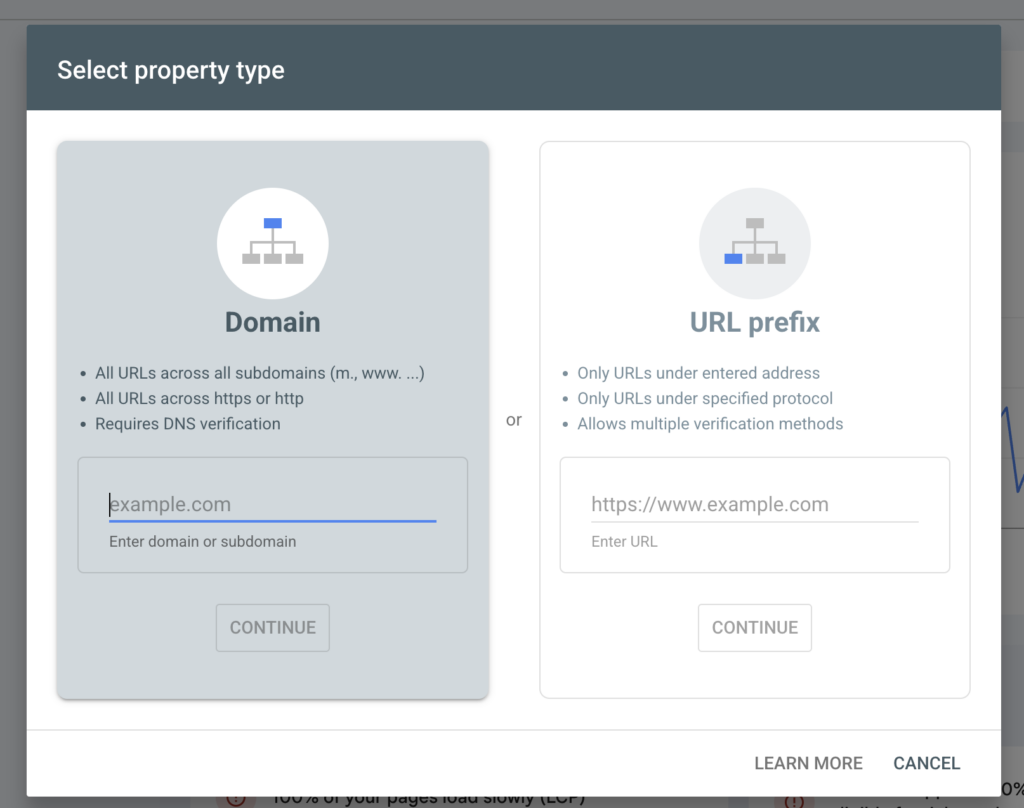 For most purposes, just go with Domain – It’s easier, it’s faster, and for 99% of the time it does the job and you can always circle back later.
How to verify ownership
This is where Google asks you to prove that you own the site, and it all depends how technical you are and how much access you already have to your website.
You’ve got four options and I’m going to explain how to set up each one individually, here’s a quick overview:
- Google Analytics or Google Tag Manager: So using either Google Analytics or Google Tag Manager (sometimes called GA4 or GTM) is definitely the quickest and most painless way to verify Search Console access. If you’ve already got access to either of those two Google products set up then we can have you set up in seconds.
- HTML tag: HTML tag verification gives you a small snippet of code to paste into your website’s template – nothing too complicated ‘if’ you have access to it. If your website runs on platforms like WordPress then this painless 5 minute job max.
- HTML file upload: HTML file upload means Google gives you a small file to upload to your server. You’d need something called FTP access for that, this is slightly more technical but if you’ve been working with a web developer or hosting company they should be able to arrange that.
- DNS TXT and CNAME records: Finally DNS TXT and CNAME records, these are a lot more technical but sometimes they’re the only choice if you’re using a locked down platform where the other verification options aren’t available. However, in some circumstances depending on your hosting provider Search Console will allow you to log into your web hosting account and do the rest of the verification for you.
They’ve all got their pros and cons but it really depends on what you have access to.
For most people, the HTML tag is easiest-especially if you use WordPress and can install a plugin.
Google Analytics and Google Tag manager
Here’s how we can connect Google Search Console to Google Analytics or Google Tag manager. This is probably the simplest option, providing you already have either of those packages installed on your website. All you have to do is be signed into the same Google account for Search Console and Google Analytics or Google Tag Manager.
Choose Google Analytics or Google Tag Manager when asked to confirm in the verification details page and click verify. That simple!
HTML Tag Verification
Let’s walk through the HTML tag option.
Google gives you a line of code to copy into a page on your website meta tags. This is hidden in the code of the template and doesn’t affect the functionality of the site. So don’t worry – your visitors won’t see it.
It’ll look something like this: <meta name=”google-site-verification” content=”…….” />
Copy that line of code to your clipboard
Now if you’re using WordPress, install a plugin like ‘Insert Headers and Footers’ or use your SEO plugin such as Yoast, Rank Math, whatever you’re already using. Paste the tag into the header section. Save it. Don’t forget that bit. Then head back to Search Console and click ‘Verify’.”
That’s it!
Troubleshooting and Confirmation
“If verification fails, don’t panic. Common issues include:
- You pasted the tag in the wrong place.
- Google is still seeing an old cached version of the page.
- You didn’t hit ‘save’.
Give it a few minutes, clear your cache, and try again. Once it works, Google shows a green checkmark and says ‘Ownership Verified’. That’s your cue to breathe again.”
And if you are stuck with a Search Console problem then now is actually a good time to tell you about contacting our team here at show@wearegenessee.com, where we’ll do what we can to help you out.
Wait!
Now you’re probably keen to explore Google Search Console, but it’s going to take time for data to start accumulating. Typically, you’ll start seeing reports within 24 to 72 hours so you’ll need to be patient.
Also worth pointing out that when data is collected it’ll start as of today – you won’t get any historical data since the website was launched unfortunately so this is another reason to set it up today.
Bonus: Bing
While you’re waiting here is an extra step. Now Google isn’t the only search engine on the block, we’ve also got Bing. And some AI services such as ChatGPT also use Bing to search for up-to-date information, so here’s your chance to get even more traffic.
Bing has a Search Console tool too which is very similar to Google’s and has some other useful features too you won’t find anywhere else, and they make it even easier to set up. Here’s all you need to do:
First head to www.bing.com/webmasters and click on the Get Started button
Then you’re going to sign in with your Google Account
It’ll then offer to import all your websites from Google Webmaster Tools into Bing Webmaster Tools, which saving you having to do any extra validation – it’s a simple as that. If you’ve got more than one website this saves you a lot more time.
I’ll cover some of the benefits of using Bing Webmaster Tools in another video , but for now you’ve set it up and it’s collecting data.
Wrap-Up
So that’s it. Your site is verified, and Search Console is ready.
If this still felt like a headache, don’t worry. We’ve put together a free PDF checklist accompanying this video over at wearegenessee.com/show
Alternatively, you can drop the team an email here at show@wearegenessee.com with your Search Console problems, or if you’ve got any more digital marketing questions, we’ll address them in a future episode.
In the next few videos, we’ll show you how to use Google Search Console to improve SEO and catch any errors before your customers see them.
And if you’re running a business and you’re ready to get serious about your visibility – we’d love to help. Head to wearegenessee.com and let’s have a chat.
Remember, we’re here to make sure when people search, they find your business – and choose your business.